Nintendo NES in game reset using an Arduino Nano
Have you ever been lazily sitting playing Nintendo and wanted to reset the console without getting up? I have, and I thought there had to be a better way... Using a cheap Arduino Nano (ATmega328) clone from Aliexpress, a few wires and a little tinkering, I created a solution.
This device passively reads the clock, latch and data lines of controller #1 waiting for the buttons Start and Select to be simultaneously pressed. When that happens it outputs 5V to the NES CIC reset line. On the North American front loading version this will reset the CPU and PPU but in the later released top loading version it will only reset the CPU. It should work on the top loader as well but it might show graphical garbage on the screen until the system resets. I have only tested this on a North American front loader so your mileage may vary with other versions. In theory this code should work with the SNES as well assuming you connect to the correct controller power/data lines and reset pin.
As the Arduino Nano is being powered by the NES voltage regulator I was concerned with it using too much power. I measured the Aliexpress Arduino Nano by default used approximately 22mA current while in use. I removed the resistor going to the "Power" LED to disable it and consumption dropped to ~18mA in use. I haven't noticed stability issues so I don't think the additional load is hurting anything. There are further power savings to be had by removing the USB serial and power regulator chips although that would make it more difficult to update the code in the future.
It's recommended to program the Arduino Nano prior to soldering it to any of the NES connections. The USB port will power the NES and could possibly cause damage. I used PlatformIO when developing the code but it will compile using the Arduino IDE as well, you just need to rename the file extension to .ino.
You can get the code on Github here:
https://github.com/JeffWDH/NES-In-Game-Reset
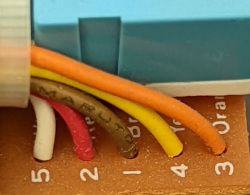
I'd recommend not soldering directly to the controller port pins. I did that and the pins moved slightly causing a connector fit issue. I was able to move the pins back but if I were to do it again I would solder to the wires instead.
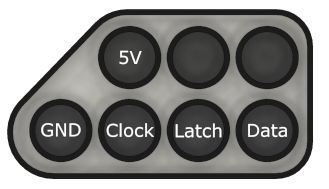
| Arduino Nano Connections | NES Connections |
|---|---|
| 5V | Controller #1 5V |
| GND | Controller #1 GND |
| A0 | Controller #1 Clock |
| A1 | Controller #1 Latch |
| A2 | Controller #1 Data |
| A3 | Power & Reset PCB PIN 4 (Reset) |